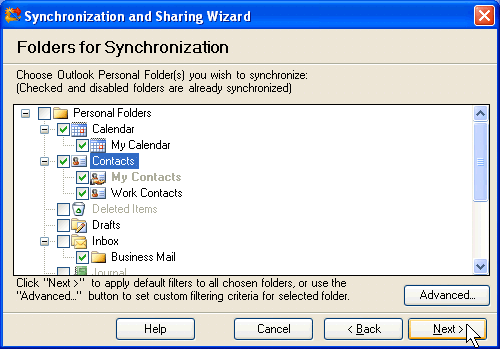
Custom Wizard – Step 2: Select the folders to be synchronized
Click on the underlined links to find out more.
During the second step, select the preferred Outlook Personal Folder(s) to be synchronized:
Select check boxes next to the folder(s) you wish to set up for synchronization. Check boxes next to all main Outlook folders (Contacts, Tasks, Inbox, Sent Items, Drafts and Calendar folders) are selected by default. Clear the check boxes, if you don't want these folders to be synchronized. Unlike Simple Wizard, Custom Wizard allows to set up for synchronization any of your Outlook folders or subfolders.
If you click Next >, default synchronization filters will be applied to all selected folders – by default, for all folder types item attachments are not synchronized, and for Calendar folders birthdays of your Contacts are not synchronized.
If you wish to change default synchronization filter(s) for a particular folder, select this folder in the Personal Folders hierarchy and click Advanced… button. Synchronization Filters form for the selected folder appears. Note that different synchronization filters are applied depending on the folder type. Select the preferred filtering options and click OK.
Note:
Folders which are disabled cannot be synchronized (Deleted Items, Journal, Junk E-mail, Notes and Outbox folders).
If the folders are disabled and check boxes are selected next to them, these folders have been set up for synchronization previously.
If you clear all check boxes selected next to the folders, you will be directed to the eighth step.
>> Next Step: Specify filters for first synchronization
<< Previous Step: Select the preferred synchronization type