How to accept/decline an invitation to share a folder
Click on the underlined links to find out more.
If some OutShare user has added you to the list of his shared folder users, you gain access to this folder, but first you must receive an invitation to share it.
In order to accept or decline an invitation to share the folder, do the following:
Start the synchronization process for all folders by clicking the Synchronize button on the main Synchronizer window toolbar.
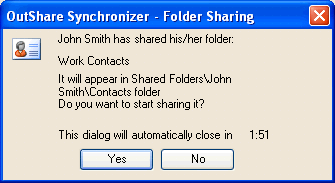
The following confirmation dialog appears when shared folders are being synchronized:
Do one of the following:
If you wish to accept the invitation to share the folder, click Yes. The synchronization process for the folder starts. After it is completed, the newly shared folder appears in the OutShare folders hierarchy in Outlook and on the Public Folder Properties form.
If you want to decline the invitation to share the folder, click No. This folder won't appear in your Outlook. However, it will appear on the Public Folder Properties form in the Shared Folders hierarchy, and its contents will be automatically excluded from synchronization. Check box Do not synchronize contents of this folder on this computer on the right pane of the Public Folder Properties form is automatically selected for this folder, and its name is marked in grey.
You can always start sharing this folder in the future by turning on synchronization for this folder on the Public Folder Properties form.
If you haven't noticed the confirmation dialog after it has appeared, or haven't clicked either of the buttons, the invitation will be accepted automatically in two minutes. You can see the timer at the bottom of the confirmation dialog.
![]()