Transfer users & Service Account to another OutShare Service Account
Click on the underlined links to find out more.
Using Service Account Administration console, Service Account administrators can transfer users and/or whole Service Account data between several Service Accounts.
Transfer of users is performed by sending a transfer request to the administrator(s) of the target Account. When the target Service Account administrator accepts the request to add a user to his/her Service Account, transfer procedure is completed. All personal data of the transferred user is imported to the target Service Account, and an e-mail with the new login information is automatically sent to the transferred user.
Transfer of Service Account is performed in the same order as indicated above. However, when transferring the whole Service Account not only all the users with their personal data are exported to the target Account, but also the Public Folders are moved to the new Service Account. Moreover, when the target Account administrator accepts the request to add the source Service Account, the transferred one is deleted from the server.
If you wish to transfer a certain user from your Service Account to another one,
Select Service Account Transfer… on the Tools menu;
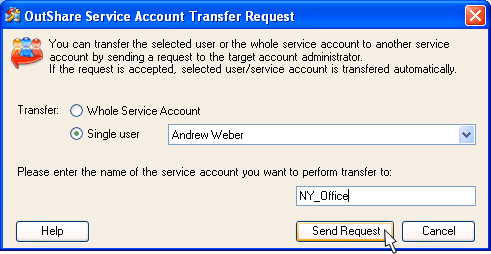
Select the 'Single User' radio button on the 'OutShare Service Account Transfer Request' form;
Choose the user to be transferred on the combo box located next to the 'Single User' radio button.
Enter the name of the Service Account you wish to perform transfer to.
Click the Send Request button.
If you wish to transfer the current Service Account to another one,
Select Service Account Transfer… on the Tools menu;
Select the 'Whole Service Account' radio button on the 'OutShare Service Account Transfer Request' form;
Enter the name of the Service Account you wish to perform transfer to;
Click the Send Request button.

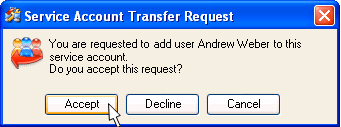
To accept the user/Service Account transfer request,
Click the Accept button on the 'Service Account Transfer Request' dialog that appears right after logging in to the Service Account Administration console.

 Notes:
When the user is transferred to another Service Account, new login information to be used for logging in to OutShare Synchronizer and/or Web Access Engine is automatically sent to the transferred user by e-mail.
Target Service Account administrators are unable to accept the transfer request when a user (or several users) with the same e-mail address(es) already exist(s) in their Service Account. In that case, target Account administrator can either skip these users or decline the transfer request.
When the whole Service Account is being transferred to another Service Account, and the user(s) with the same e-mail address(es) are skipped from transfer, the transferred Service Account is not deleted from the server, and these skipped users automatically become the administrators of the source Service Account.