How to set local mode
Click on the underlined links to find out more.
Connection mode defines whether connection with the server can be established. When the user sets local mode, connection with the server can not be established and changes made in Outlook are saved to the local database only. This mode can be useful if you want to increase your system performance over a long time period by cutting the connection with the server. When the user sets server mode again, all changes made in his Outlook while working in local mode are sent from the local database to the server during the first synchronization process.
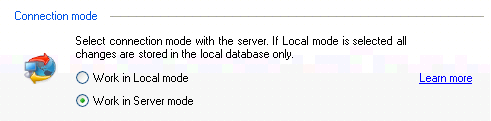
You can set the mode of connection with the server on the Advanced Settings tab of the OutShare Settings form. Connection mode can be selected in the Connection mode section:
In order to set local mode, do the following:
Open the Advanced Settings tab on the OutShare Settings form.
Select the Work in Local mode radio button. Connection with the server will become unavailable. All changes made in your Outlook will be stored only to the local database. Select this mode, if you don't want to synchronize your changes with the server.
Click the Apply button.
Click Yes in the confirmation dialog. All changes will be saved.
Click OK to exit the form.
The Synchronizer icon on the taskbar notification
area indicates that connection with the server is not established at the
moment: ![]() .
.
Note: After you have set local mode, Synchronizer works and you can configure settings which do not require connection with the server (e.g. synchronization settings on the Synchronization Settings tab and particular settings on the OutShare Settings form). All functions for which connection with the server is required will be disabled.
![]()