How to merge duplicate/conflict items
Click on the underlined links to find out more.
If conflict/duplicate item versions stored on the server and in the local database have fields with different values, you can merge these fields into one manually.
In order to merge field value of the conflict/duplicate item stored in the local database and the one stored on the server, do the following:
Select the Duplicates or Conflicts tab on the Advanced Duplicates and Conflicts Management form.
Select the check box next to the duplicate or conflict item in the list and click the Merge… button at the bottom of the form. The Merging Rules dialog appears.
Note: You can select several duplicate/conflict items at once by selecting check boxes next to these items. In this case you will be able to merge these duplicate/conflict items one by one.
Select one of the following merging options:
Click the AutoMerge button, if you want merging to be done automatically. The user doesn't take part in the merging process, which is performed according to the following rules:
If a particular field of the duplicate/conflict item is empty, the settings specified on the Synchronization Options tab of the OutShare Settings form are considered:
If the Always replace empty fields check box is not selected in the Duplicates options/ Conflicts options group box, this empty field is not replaced.
If the Always replace empty fields check box is selected in the Duplicates options/ Conflicts options group box, this empty field is replaced.
If a particular field of the duplicate/conflict item is not empty, merging is performed according to the following rules:
If the local item has later modification date for this field, this value is left in the resulting item.
If the server item has later modification date for this field, value for this field is replaced with the value from the server item.
Click Manual Merge..., if you want to merge item versions manually.
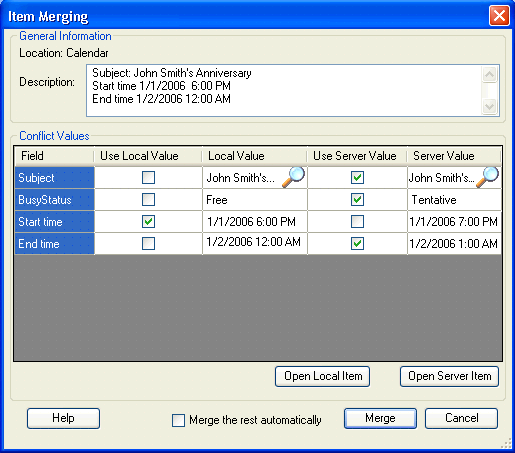
If you select Manual Merge..., the Item Merging form is opened, which allows you to perform item merging manually.
At the top of the form, the location of the item and its description are displayed. The Conflict Values table displays all details of the conflict or duplicate item. The item field values stored in the local database and on server are displayed in the Local Value and Server Value columns.
If you want to preview the item version stored in the local database or on the server, click the Open Local Item or Open Server Item button correspondingly. The standard Outlook form with local/server item version is opened.
You can choose which field value will be used in the resulting item field:
If you want the item field value stored in the local database to be used in the resulting item field, select the check box in the Use Local Value column.
If you want the item field value stored on server to be used in the resulting item field, select the check box in the Use Server Value column.
Select the preferred check box for each field in the Conflict Values table or leave the check box selected by default.
If some field values in the Local Value or Server
Value column are too large, this is indicated by the magnifying
glass icon. You can view such values by clicking the ![]() icon
in the corner. The Conflict
Values
form appears, where you can choose which value of the particular
field – local or server value – will be used in the resulting item field
by selecting the appropriate radio button. Depending on your choice, the
check box in the Use Local Value
or Use Server Value column is
automatically selected on the Item Merging
form.
icon
in the corner. The Conflict
Values
form appears, where you can choose which value of the particular
field – local or server value – will be used in the resulting item field
by selecting the appropriate radio button. Depending on your choice, the
check box in the Use Local Value
or Use Server Value column is
automatically selected on the Item Merging
form.
Select the Merge the rest automatically check box, if you want other items for which check box is selected on the Duplicates/Conflicts tab of the Advanced Duplicates and Conflicts Management form to be merged automatically.
Click the Merge button. The Item Merging form is closed, and the item disappears from the list of items on the Duplicates or Conflicts tab.
If check boxes for several items were selected on the Duplicates/Conflicts tab, the same window for the next item merging appears.
When you've finished merging all items, click the Close button to exit the Advanced Duplicates and Conflicts Management form.
![]()