
How to create a Public Folder from Outlook
Click on the underlined links to find out more.
In order to create a public folder from your Outlook, do the following:
Right-click the Public Folders or any public folder in Public Folders hierarchy in the Folders List on the Navigation Pane and select New Folder… from the standard Outlook menu:
The standard Outlook Create New Folder form appears. Enter the name and type for the new public folder the same way you do in Outlook.
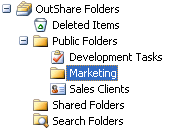
The new public folder appears in the Public Folders hierarchy on the Navigation Pane:
You can place any preferred Outlook items in it, which can then be viewed by all users of your Service Account according to the permissions they have been given.
Start the synchronization process in order to synchronize the newly created public folder with the server.
In order to make public folder accessible for other users, open the Public Folder Properties form, add users or user groups to the new public folder and set permissions for them.
Start the synchronization process in order to save the user permissions data to the server.
Finally, in order for users to view the contents of public folder, they should also start the synchronization process in their Synchronizer.
Important:
In order for the OutShare folders hierarchy to appear in your Outlook, you should start the synchronization process at least once.
You cannot create a public folder and set permissions for its users, if you don't have the 'Create' and 'Set Permissions' permissions respectively.
![]()