How to Select Synchronizer Disabling/Enabling Options from OutShare Settings Form
Click on the underlined links to find out more.
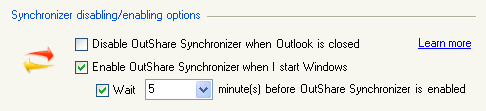
Options for disabling/enabling Synchronizer can be selected on the Advanced Settings tab of the OutShare Settings form. In the Synchronizer disabling/enabling options section, you can choose to disable Synchronizer when your Outlook is closed, to enable it automatically when Windows starts and set time interval for Synchronizer to wait after Windows has started.
Synchronizer is designed to constantly save all changes made to your Outlook folders data on all your computers. Therefore, when Synchronizer is enabled, all actions performed in your Outlook are tracked all the time and the Outlook process is always running in the background. Only when Synchronizer is disabled are actions performed in your Outlook no longer tracked and Outlook is removed from system processes. Alternatively, if the Outlook process is not running and Outlook is opened, Synchronizer is enabled automatically in order to track all further changes made to your Outlook folders data.
Synchronizer disabling/enabling options are meant exactly for managing Outlook process in the system processes list.
If
Synchronizer is disabled, this is indicated by the Synchronizer icon on
the taskbar notification area: ![]() .
.
In order to set Synchronizer disabling/enabling options, do the following:
Open the Advanced Settings tab on the OutShare Settings form.
In the Synchronizer disabling/enabling options section, select the Disable OutShare Synchronizer when Outlook is closed check box, if you wish to disable Synchronizer automatically when your Outlook is closed. In this case Outlook will be both closed and removed from system processes:
Note: Synchronizer will be disabled only if there are no open forms in your Outlook and Synchronizer, except for the main Synchronizer window.
The Enable OutShare Synchronizer when I start Windows check box is selected by default. In this case Synchronizer is enabled automatically when Windows starts and the Outlook process starts running immediately after Synchronizer is enabled. Clear this check box, if you don't want Synchronizer to be enabled automatically when Windows starts.
The Wait check box can be selected only when the Enable OutShare Synchronizer when I start Windows check box is selected. This check box helps to prevent low system performance when Windows starts, as it allows the enabling of Synchronizer only after a set time has passed from Windows start. By default, this time period is set to two minutes. If you want to change it, select the preferred time from the combo box. Clear the Wait check box, if you want Synchronizer to be enabled at once when Windows starts. Note that in this case system performance when starting Windows may be slightly lower.
Click Apply to save the changes.
Click OK to exit the form.
![]()